Category: Quality
C# MEF BrowserFactory for Browser Based Testing
In TestPipe, my browser based test framework, I use MEF to help abstract the concept of a browser. The reason I do this is so I am not tied to a specific browser driver framework (e.g. WebDriver, WatiN, System.Net.WebClient). This allows me to change drivers without having to touch my test code. Here’s how I do it.
Browser Interface
First I created an interface that represents a browser. I used a mixture of interfaces from WebDriver and WatiN.
namespace CharlesBryant.TestPipe.Interfaces
{
 using System;
 using System.Collections.Generic;
 using System.Collections.ObjectModel;
 using CharlesBryant.TestPipe.Browser;
 using CharlesBryant.TestPipe.Enums;
public interface IBrowser
 {
 IBrowserSearchContext BrowserSearchContext { get; }
BrowserTypeEnum BrowserType { get; }
string CurrentWindowHandle { get; }
string PageSource { get; }
string Title { get; }
string Url { get; }
ReadOnlyCollection WindowHandles { get; }
IElement ActiveElement();
void Close();
void DeleteAllCookies();
void DeleteCookieNamed(string name);
Dictionary<string, string> GetAllCookies();
bool HasUrl(string pageUrl);
void LoadBrowser(BrowserTypeEnum browser, BrowserConfiguration configuration = null);
void Open(string url, uint timeoutInSeconds = 0);
void Quit();
void Refresh();
void SendBrowserKeys(string keys);
void TakeScreenshot(string screenshotPath);
void AddCookie(string key, string value, string path = "/", string domain = null, DateTime? expiry = null);
}
}
Pretty basic stuff although BrowserSearchContext took some thought to get it working. Basically, this abstraction provides the facility to search for elements. A lot of the concepts here are borrowed from WebDriver and WaitN and are just a way to be able to wrap there functionality and use it without being directly dependent on them. To use this you have to change your tests from directly using a browser driver to using this abstraction. At the start of your tests you use the BrowserFactory to get the specific implementation of this interface that you want to test with.
Browser Factory
Then I created a BrowserFactory that uses MEF to load browsers that implement the browser interface. When I need to use a browser I call Create in the BrowserFactory to get the browser driver I want to test with. To make this happen I have to actually create wrappers around the browser drivers I want available. One caveat about MEF is that it needs to be able to find your extensions so you have to tell it where to find them. To make the browsers available to the factory I added an MEF class attribute, [Export(typeof(IBrowser))] to my browser implementations. Then I add a post build event to the browser implementation projects to copy their DLL to a central folder:
copy $(TargetPath) $(SolutionDir)\Plugins\Browsers\$(TargetFileName)
Then I added a appConfig key with a value that points to this directory to the config of my clients that use the BrowserFactory. Now I can reference this config value to tell MEF where to load browsers from. Below is sort of how I use the factory with MEF.
namespace CharlesBryant.TestPipe.Browser
{
 using System;
 using System.ComponentModel.Composition;
 using System.ComponentModel.Composition.Hosting;
 using System.Configuration;
 using System.IO;
 using System.Reflection;
 using CharlesBryant.TestPipe.Enums;
 using CharlesBryant.TestPipe.Interfaces;

 public class BrowserFactory
 {
 [Import(typeof(IBrowser))]
 private IBrowser browser;

 public static IBrowser Create(BrowserTypeEnum browserType)
 {
 BrowserFactory factory = new BrowserFactory();
 return factory.Compose(browserType);
 }

 private IBrowser Compose(BrowserTypeEnum browserType)
 {
 this.browser = null;

 try
 {
 AggregateCatalog aggregateCatalogue = new AggregateCatalog();
 aggregateCatalogue.Catalogs.Add(new DirectoryCatalog(ConfigurationManager.AppSettings["browser.plugins"]));
 CompositionContainer container = new CompositionContainer(aggregateCatalogue);
 container.ComposeParts(this);
 }
 catch (FileNotFoundException)
 {
 //Log
 }
 catch (CompositionException)
 {
 //Log;
 }

 this.browser.LoadBrowser(browserType);
 return this.browser;
 }

namespace CharlesBryant.TestPipe.Enums
{
public enum BrowserTypeEnum
 {
 None,
 IE,
 Chrome,
 FireFox,
 Safari,
 Headless,
 Remote,
 Other
 }
}
 }
}
Conclusion
Well that’s the gist of it. I have untethered my tests from browser driver frameworks. This is not fully tested across a broad range of scenarios so there may be issues, but so far its doing OK for me.
The examples above are not production code, use at your own risk.
My Best Practices for Functional Testing
I am not a big fan of best practices because they have proliferated to the point that it’s hard to trust that some arbitrary blog espousing best practices has really put in the time and has the experience behind the practices to qualify them as best. So, I qualify this post with “MY”. These are practices that I am using right now that have proven to work for me across multiple projects. I am by no means a Functional Testing guru. I have been a developer for many years, but just started functional testing full time last month. Much of this has roots in other “best practices” so there is really nothing new, just developer common sense. This is just a way for me to start to catalog my practices for future reference and to share with the community.
- Coherent – scenarios should assert a single concept. Unlike unit testing I believe it is OK to make multiple assertions in a functional test because rerunning the same 10 second process to make discrete assertions across the state of a page is a waste of time. The multiple asserts should each include some type of message so you know which one failed. Even though I advocate making multiple assertions the assertions should be related. You should not assert that your button click worked because you landed on the correct page, then assert that the landing page has the correct content and clicking a link on the landing page sent you to the home page. This is an example of asserting multiple concepts and this type of multiple assertion is a no-no. In the example, asserting the button click worked, asserting the page has the correct content, and asserting that the link worked are all different concepts that express distinct concerns that should be asserted in isolation. This test should have only been an assertion that the button clicked worked and sent you to the correct page.
- Light – keep your scenario definitions light on details and heavy on business value. Do try to define a script that a QA tester can follow in there testing, but express only the details necessary to convey the concerns that address the business value of the feature. The other asserts should have been in other tests. If you are defining a business process for making a payment on a website you don’t have to state every step taken to get to the payment page or every mouse click and keystroke taken to enter, submit and verify the payment. Pull out the steps the can be implied. Have your scenarios read more like a story for business people and not a script for QA and developers. Even if you don’t have business people reading the features and scenarios, you will find that they become a lot easier to maintain because they aren’t tied to details that can change wildly in new feature development.
- Independent – scenarios should not rely on the results of any other scenario. Likewise you should insure your scenarios are not influenced by the results of other scenarios. I learned the term “Flaky Test” by watching a couple videos by the Google test team. Flaky tests are tests that sometimes pass and sometimes fail even though the test input and steps don’t change. Many times this is because of side effects produced by previously ran scenarios. A developer way of expressing this would be given a test that is ran with the same input should produce the same result on each test run. The test should be idempotent.
- Focused – in your test action or “When” step, in Gherkin, you should only trigger one event in your domain. If you are triggering multiple actions, from across multiple contexts it becomes difficult to know what is being tested. Many times when I see tests with multiple “when” steps they are actually mixing additional “given” or setup steps with the actual action of the test. You could say that this is just semantics and I’m being a Gherkin snob protecting the sanctity of the Gherkin step types, but to me it just keeps scenarios simple when you know exactly what is being tested. If you feel like the multiple “when” steps are valid combine them into one step and express the multiple actions in the code behind the scenario. Keep your scenario definition focused on testing one thing.
- Fast – be mindful of the performance of your scenarios. Even though you may be writing slow functional tests you should not add to the slowness by writing slow code to implement your scenarios. I would take this further and say that you should write test code with the same care and engineering discipline that is used to write production code.
- Simple – try not to expose complexities in your test steps. Wrap your complexities. This is similar to keeping the test focused, but extends to the entire scenario and test code not just the action step in your scenario definition. This is both a feature analysis and test development principle. Think about the Page Object Model. It hides complexities of page interactions and improves maintainability of tests while making your test code and scenario definitions simple. Don’t include a lot of complex details in your scenarios or they will be bound to the details and when the details change you will have to change the scenario, the step code and probably more to make the change.
Yes, that spells CLIFFS. I wanted to join the acronym bandwagon. This would be a better post if it had examples or explanations, but this is a lazy post to keep my blogging going. If you disagree or want clarification, I would be glad to do a follow up on my thoughts on these practices. I am anxious to see how these stand up to a review at the end of this year.
A Twist on Test Structure
As you may not know, I love testing. Unit tests, integration tests, performance tests, and acceptance tests all have a prominent place in my development methodology. So, I love when I learn new tips and tricks that help simplify testing. Well Phil Haack did a post on “Structuring Unit Tests” that was quite ingenious even though he got it from a guy (Drew Miller), who got it from two other guys (Brad Wilson and James Newkirk).
The gist is to write a test class to contain tests for a specific class under test. Then have sub classes within the test class for each method of the class under test. Then Brian Rigsby took it further and showed how to reuse initialization code written in the parent class for all of the sub classes. Below is the result of structuring from Brian’s blog.
[TestClass]
 public class TitleizerTests
 {
 protected Titleizer target;

 [TestInitialize]
 public void Init()
 {
  target = new Titleizer();
 }

 [TestClass]
 public class TheTitleizerMethod : TitleizerTests
 {
  [TestMethod]
  public void ReturnsDefaultTitleForNullName()
  {
      //act
      string result = target.Titleize(null);

      //assert
      Assert.AreEqual(result, "Your name is now Phil the Foolish");
  }

  [TestMethod]
  public void AppendsTitleToName()
  {
      //act
      string result = target.Titleize("Brian");

      //assert
      Assert.AreEqual(result, "Brian the awesome hearted");
  }
 }
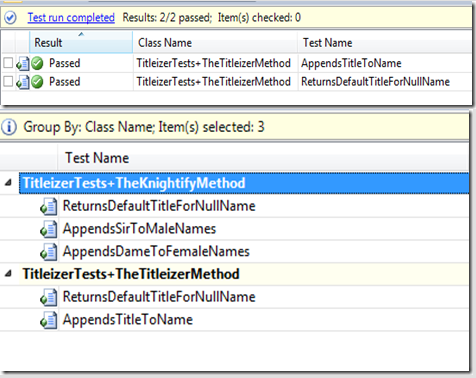
I like how the results are better structured as a result of this test code structure without having to repeat initialization code. The problem with this approach is that it violates Code Analysis rule CA1034: Nested types should not be visible. I know this is a test class and not production code, so maybe I am pointing out something that is not worth pointing out. The thing is I have been bitten a few times by thinking it is OK to ignore Code Analysis rules so I have to do my due diligence to insure this won’t cause issues down the road. Also IMHO, test code should be as good as production code.
So far it seems as if the main reason for the rule is to protect external callers of the publically exposed nested types. Maintainability is the common theme I can find in explanations. If you move the nested type outside of the contained type it will be a breaking change for external caller. For now, I will ignore the rule as I try this test structure out, but I am afraid…very afraid.
Architecture Validation in Visual Studio
As a part of my Quality Pipeline I want to validate my code against my architectural design. This means I don’t want invalid code integrations, like client code calling directly into data access code. With Visual Studio 2012 this is no problem. First I had to create a Modeling Project. Then I captured my architecture as a layer diagram. I won’t go over the details of how to do this, but you can find resources here
- http://www.dotnetcurry.com/ShowArticle.aspx?ID=848
- http://msdn.microsoft.com/en-us/library/57b85fsc(v=vs.110).aspx
Next I added
<ValidateArchitecture>true</ValidateArchitecture>
to my model project’s .modelproj file. This instructs MSBuild to validate the architecture for each build. Since this is configured at the project level it will validate the architecture against all of the layer diagrams included in the project.
For a simpler way to add the configuration setting here is a MSDN walk through – http://msdn.microsoft.com/en-us/library/dd409395(v=vs.110).aspx#ValidateAuto
- In Solution Explorer, right-click the modeling project that contains the layer diagram or diagrams, and then click Properties.
- In the Properties window, set the modeling project’s Validate Architecture property to True.
This includes the modeling project in the validation process. - In Solution Explorer, click the layer diagram (.layerdiagram) file that you want to use for validation.
- In the Properties window, make sure that the diagram’s Build Action property is set to Validate.
This includes the layer diagram in the validation process.
Adding this configuration to the project file only validates my local build. As part of my Quality Pipeline I also want to validate on Team Build (my continuous build server). There was some guideance out there in the web and blogosphere, but for some reason my options did match what they were doing. You can try the solution on MSDN (http://msdn.microsoft.com/en-us/library/dd409395(v=vs.110).aspx#ValidateAuto). Like I said, this didn’t work for me. I had to right click the build definition in Build Explorer and click Edit Build Definition. On the Process tab, under Advanced, I added
/p:ValidateArchitecture=true
to MSBuild Arguments.
Now my code is guarded against many of the issues that result from implementations that violate the designed architecture.
My Issues with Parallel Test Execution in .Net
In a previous post I described how to get Selenium Grid up and running. The main reason for doing that is to speed up test execution. Well, that is my main reason. You may want easy testing cross browser, OS, device or something. At any rate, to get the speed we have to run the tests in parallel. Getting the Grid up was the easy part, running the tests in parallel is the hard part. How do we run tests in parallel? Warning this may be more of a rant that solution.
If we were using MBUnit, it would be simple. Parallel is built into the DNA of MBUnit, but the MBUnit project is on hiatus right now and direction seems to be up in the air. We currently use NUnit as our test framework at work, but it doesn’t support parallel execution. The next version of NUnit is supposed to support it, but it has been promised for a long time now. I use MSTest a lot, but I have never run it in parallel. I heard it is possible, but I also heard there are issues with it and the fact that Visual Studio 2013 now uses VSTest which doesn’t have parallel support, I am not sure what this means for MSTest. I guess I’m rambling as I am rehashing another post, “NUnit, OK Maybe“. The point is parellel test execution is a problem that should have been solved by now across the test frameworks in the .NET community. Hopefully, there will be changes this year.
Anyway, back to the topic at hand, I decided to look into PNUnit. PNUnit brings parallel execution to NUnit, but the documentation claims that it is a solution for running the same test suite in parallel across multiple instances and I need to run individual test across Nodes to increase speed of test execution, so I am not sure if PNUnit is a viable solution. Another problem with PNUnit is you have to configure the tests you want to run in parallel. This is not a maintainable solution at first glance as having to update configuration files every time I add a test would get old real quick.
So, even though MBUnit may or may not be dead I look more into it. Like I said, at work we currently use NUnit so we would have to convert a lot of tests, but it may be possible to automate a lot of the conversion. The main difference in code between the two would be the dependencies (using’s), class and method attributes, and assertions. So, we could probably convert 90% of the code with just plain find and replace or a quick code hack that does something similar. We would also have to do some work to get reporting to produce that same report on the build server. With that in mind I will look more into MBUnit, even if it is dead the source is available on GitHub.
While I am checking out MBUnit I will also have a look at TPL and the async keyword in .NET 4.5. My test framework already has concepts built in that would allow me to actually create my own test runner. I just have to learn the new tools in .NET for parallel and asynchronous coding. This would be a MAJOR under taking and not one I want to do right now, but I will if its what I have to do to speed these browser tests up.
Another issue I have now is I share a single driver across all tests in a fixture. I create a driver when the fixture is created and I cache it so the individual tests can use it without having to recreate it. This is great when the tests run one after the other. Now I need to change it so that each test has its own driver so they won’t step on each other’s toes. This isn’t that hard as I have a central setup methods for my fixtures and tests so the change would only have to occur in a couple spots (I try to keep it SOLID can’t stress this enough). So, I will move the driver creation from the fixture setup to the test setup and I am ready for parallel browser automation, or am I?
Having to fix the driver setup issue made me look closer at things that I am sharing across tests. Getting parallel tests is going to take a little more than flipping a couple switches to turn it on. Did I mention this is the hard part? The lesson learned from the shared driver is to insure your tests are idempotent during parallel execution. Hell, tests should be idempotent period, regardless of parallel execution. If you share anything across the tests, they can not have an effect on the outcome of other tests regardless of where or how they run. Whether they are in separate assemblies, in the same test fixture or they execute on different Grid Nodes a test can not create side effects that change the results of other tests. If they do produce side effects, you will begin to not trust your tests as they will start failing for reasons that have nothing to do with code changes. When you run tests in parallel it becomes a little tricky to locate where you violate the idempotent rule.
In my case I have to do an in depth review of shared data, functionality, and state. So far my biggest issue is I have a static class that I use to store various values during test execution. I call it TestSession and its basically a cache that allows me to save time by creating certain objects once and it also gives me a way to pass state from one test step to the next. TestSession keeps things separated by prefixing the session keys in a way that tests don’t share data, but there are fixture session keys that are shared amongst tests. Also, at the end of fixture execution we clear the entire TestSession object. So, if the state cached in a fixture session key is changed by one test it may have an effect on another test. I am pretty sure that I don’t do this, but there is nothing that prevents me from doing it so I have to look through the code. Also, if the session is cleared before all of the tests have completed there may be problems. So, I have to rethink TestSession completely. I may create an immutable session for the fixture and mutable session for the tests.
Well that’s it for now. I am starting to bore myself :). This is more of a post on my issues with parallel test execution and less of a solution post. I guess this is what you would call a filler just to keep my blogging going. If you made it this far and you have some ideas on how to solve parallel test execution in .NET, please leave me a comment.
Setup Selenium Grid for .NET
Purpose
I need to run my browser automation tests in parallel as they are painfully slow and I need to be able to provide developers with fast feedback on the state of there changes. Really, what is the point of spending time and effort on creating tests that no one wants to run because they take hours to run. In my opinion it was vital to get this going in order to get a return on the time and effort invested in our browser based test development.
We are a .Net shop and for our situation the best option for parallel browser testing is Selenium Grid, a Java platform. Quick overview, Selenium Grid uses a Hub to distribute tests to Nodes that actually run the test in the selected browser. Below I will explain how I got the Grid up and running.
Setting Up
Setup is pretty easy. All you have to do is download the Selenium Server standalone JAR file from http://selenium-release.storage.googleapis.com/index.html. You will have to install this file to all the machines that you will use as Hubs and Nodes. One quick note, you have to have JRE (Java Runtime Environment) setup on each machine you want to use as a Hub or Node.
The Hub
If you have the JRE setup and on your system environment path, you can simply start the server with this command from the location of your Selenium Server standalone JAR file:
java -jar selenium-server-standalone-2.39.0.jar -port 4444 -role hub -nodeTimeout 600
I am using the 2.39.0 version of the server (make sure you use the correct name for your JAR file). This command starts the server on port 4444 with the Hub role and a timeout of 600 seconds. You can tuck this away in a bat file for easy access.
You can verify the hub is listening by viewing it in a browser. If you are on the hub machine, you can just go to localhost like so, http://localhost:4444/grid/console. This will present you with a page that you can view the configuration for the server.
To stop the Hub you just send it a command:
http://localhost:4444/selenium-server/driver/?cmd=shutDownSeleniumServer
Adding Nodes
Having a Hub and no Node is just plain stupid. So, we need to add a Node to the Grid so that it can pass tests to it. The Hub will determine which Node to send a test to based on the properties requested by the test. So, we have to inform the Hub what properties the Node supports. There are a couple ways to do this, but I am going to use the command line to configure the Node. The way of the Ninja would be to use a JSON file, but I gave up on it after I couldn’t get it to recognize the JSON after about 30 minutes of research and trying. Actually, you can configure the Hub with JSON too, so you may want to look into this option as it makes your bat files cleaner and as you increase the Nodes you need it may cut down on duplication in your bat file too.
NOTE: If you are going to use IE or Chrome you should add the path to the drivers on your system path or you may see an error like:
*The path to the driver executable must be set by the webdriver.ie.driver
system property; for more information, see
http://code.google.com/p/selenium/wiki/InternetExplorerDriver. The latest
version can be downloaded from
http://selenium-release.storage.googleapis.com/index.html*
To start the node, run this command and don’t forget to run it in the path of your jar file and to update the file name/version appropriately.
java -jar selenium-server-standalone-2.39.0.jar -role webdriver -browser "browserName=internet explorer,version=8,maxinstance=1,platform=WINDOWS" -hubHost localhost –port 5555
This starts the Node and registers it on the Hub. You can also add this to a bat file. Again, you can verify it started by opening up the Grid console and you will see the Node browsers in the Browser tab, http://localhost:4444/grid/console
Running Tests
To run a test you have to use the RemoteDriver and pass it the DesiredCapabilities for the browser that tells the Hub what Node to use to satisfy the test.
DesiredCapabilities capabilities = new DesiredCapabilities.InternetExplorer();
capabilities.SetCapability(CapabilityType.Platform, "WINDOWS");
capabilities.SetCapability(CapabilityType.BrowserName, "internet explorer");
capabilities.SetCapability(CapabilityType.Version, "8");
IWebDriver webDriver = RemoteWebDriver(capabilities);

Note: the code above is not best practice because it is not SOLID. If your test code isn't SOLID, you need to change your code to use a factory, IoC, or whatever you need to do to remove the dependence on concrete drivers and its supporting DesiredCapabilities. I will leave that as an exercise for you until I publish my framework code :).
This may be a big change to your tests as you would have to replace every place you use a concrete WebDriver to using the RemoteDriver. If you code for IWebDriver instead of a concrete driver and have a single point for the creation of WebDrivers (see note in code above), it wouldn’t be that bad as you are just adding another instance of IWebDriver.
Conclusion
Well that’s it. The biggest hurdle IMHO is just writing your code in a manner that makes it easy to to switch WebDriver instances. Now I have to figure out how to run tests in parallel, oh boy!
References
- The documentation for Grid is on the Selenium Wiki – https://code.google.com/p/selenium/wiki/Grid2
- I got a lot of good info from PacktPub.com – http://www.packtpub.com/sites/default/files/downloads/Distributed_Testing_with_Selenium_Grid.pdf
- Jon Austen provides some Windows batch scripts to start the Server and Node on his blog – http://thegreenoak.blogspot.com/2013/03/scripts-to-run-selenium-grid-hub-and.html
Validating Tab Order with WebDriver
I had a spec that defined the tab order on a form. Starting with the default form field the user will be able to press the tab key to move the cursor to the next form field. Tabbing through the fields will follow a specific order. I couldn’t find much on Google or Bing to help automate this with WebDriver, maybe I’m loosing my search skills.
Below is code to implement this with WebDriver. In production I use a SpecFlow Table instead of an array to hold the expected tab order and I have a custom wrapper around WebDriver so much of this code is hidden from test code. Below is the untested gist of my production implementation. Since all of my elements have IDs, and your’s should too, we are simply validating that the active element has the ID of the current element in the array iteration.
- If the element doesn’t have an ID, fail the test.
- If the element ID doesn’t match the expected ID, fail the test.
- If the ID matches, tab to the next element and loop.
 public void TestTabOrder()
 {
 //Code to open the page elided.
 ....

 //This is the expected tab order. The strings are element IDs so the test assumes all of your elements have IDs.
 string[] orderedElementIds = new string[] { "FirstControl", "SecondControl", "NextControl" };

 foreach (var item in orderedElementIds)
 {
 string elementId = item;

 //Get the current active element, element with focus.
 IWebElement activeElement = webDriver.SwitchTo().ActiveElement();

 //Get the id of the active element
 string id = activeElement.GetAttribute("id");

 //If the active element doesn't have an id, fail the test because all of our elements have IDs.
 if (string.IsNullOrWhiteSpace(id))
 {
 throw new AssertionException("Element does not have expected ID: " + elementId);
 }

 //If the active element doesn't match the current ID in our orderedElementIds array, fail the test.
 if (elementId != id)
 {
 throw new AssertionException("Element: " + elementId + " does not have focus.");
 }

 //Tab to the next element.
 activeElement.SendKeys(Keys.Tab);
 }
 }
You don’t have to assert anything as the exceptions will fail the test (using MSTest AssertionException), hence no exception equals passing test. You get a bonus assert with this test in that it also verifies that you have a certain element with default focus (the first element in the array).
I am sure there is a better way to do this, but it works. Hope this helps someone as it wasn’t something well publicized.
.NET Code Coverage with OpenCover
I made more progress in improving my Code Quality Pipeline. I added test code coverage reporting to my build script. I am using OpenCover and ReportBuilder to generate the code coverage reports. After getting these two tools from Nuget and Binging a few tips I got this going by writing a batch script to handle the details and having NAnt run the bat in a CodeCoverage target. Here is my bat
REM This is to run OpenCover and ReportGenerator to get test coverage data.
REM OpenCover and ReportGenerator where added to the solution via NuGet.
REM Need to make this a real batch file or execute from NANT.
REM See reference, https://github.com/sawilde/opencover/wiki/Usage, http://blog.alner.net/archive/2013/08/15/code-coverage-via-opencover-and-reportgenerator.aspx
REM Bring dev tools into the PATH.
call "C:\Program Files (x86)\Microsoft Visual Studio 12.0\Common7\Tools\VsDevCmd.bat"
mkdir .\Reports
REM Restore packages
msbuild .\.nuget\NuGet.targets /target:RestorePackages
REM Ensure build is up to date
msbuild "MyTestSolution.sln" /target:Rebuild /property:Configuration=Release;OutDir=.\Releases\Latest\NET40\
REM Run unit tests
.\packages\OpenCover.4.5.2316\OpenCover.Console.exe -register:user -target:"C:\Program Files (x86)\Microsoft Visual Studio 12.0\Common7\IDE\mstest.exe" -targetargs:"/testcontainer:.\source\tests\MytestProjectFolder\bin\Debug\MyTestProject.dll" -filter:"+[MyTestProjectNamespace]* -[MyTestProjectNamespace.*]*" -mergebyhash -output:.\Reports\projectCoverageReport.xml

REM the filter +[MyTestProjectNamespace]* includes all tested classes, -[MyTestProjectNamespace.*]* excludes items not tested
REM Generate the report
.\packages\ReportGenerator.1.9.1.0\ReportGenerator.exe -reports:".\Reports\projectCoverageReport.xml" -targetdir:".\Reports\CodeCoverage" -reporttypes:Html,HtmlSummary^ -filters:-MyTestProject*
REM Open the report - this is just for local running
start .\Reports\CodeCoverage\index.htm
pause
Issues
I have integration tests that depend on files in the local file system. These were failing because OpenCover runs the tests from a different path than the one the files are copied to during build. To overcome this I added the DepoloymentItem attribute to my test classes for all of the files I depend on for tests. This attribute will cause the files to be moved to the test run location with the DLLs with OpenCover does its thing.
[TestClass]
[DeploymentItem("YourFile.xml")] //Can also be applied to [TestMethod]
public class YourAwesomeTestClass
{

}
Another problem I had prevented the database connection strings from being read from the app.config. I was running MSTest with the /noisolation command line option. I removed the option and it worked. It seems like noisolation is there to improve performance of the test run. I don’t see much difference in timing right now and when I hit a wall in the time of my test execution I will revisit…no premature optimization for me. See
Virtualization Strategy for Browser Based Testing
I have been ramping up my knowledge and startegies for browser based testing on virtual machines (VM) and thought I would capture some of the best practices I have so far.
- Start a new VM at start of test and destroy it at end of test.
- Keep VM images small. Only have the bare minimum of software needed to run your test included in the VM image. Get rid of any default software that won’t be used.
- Compress the VM image.
- Image storage
- SANS – storage area network. They are expensive ,but the best options for IO intensive scenarios such as this.
- Use solid state drives – this is the next best option, but expensive. You’re able to have more efficient access from one drive when compared to rotating head drives.
- Image per drive on rotating head drive – this is the least expensive option, but also the least efficient. Since IO is slow on these drives you could spread your images across multiple drives to improve parallel VM startup.
That’s where I am so far. Still need to get experience with various implementations of each practice. Should be fun.
NUnit, OK Maybe
Don’t get me wrong there is nothing wrong with NUnit and it may or may not be superior to MSTest. I am currently a user of MSTest in my personal projects and the jury is still out if I will use it at work. I just never found a truly compelling reason to use one over the other. MSTest comes well integrated in Visual Studio out the box and had the least amount of pain in terms of setup and getting a test project going. With the release of VS 2012, the playing field has been leveled a bit more as I can run an NUnit test through the Test Explorer, just like an MSTest/VSTest. This is accomplished by adding a simple NuGet package to the test project, NUnit Test Adapter for VS2012 and VS2013.
Anyway, another compelling reason to choose one over the other that I keep bumping into is being able to run tests in parallel. MSTest has the ability to run tests in parallel, but the implementation doesn’t sound solid by some of the posts I have been reading. VSTest, the VS 2012+ default test engine, does not run tests in parallel. NUnit does not support parallel either although the community has been waiting on the next version that is supposed to have this feature…if it ever is released.
Actually, the reason for this post is I was doing a little reading up on PNUnit. It is supposed to run NUnit tests in parallel. Not sure how good the project is, but their website started discussing the need to run their tests across Windows and Linux. Ah..ha! there you go. If you need to run cross platform tests you may lean towards NUnit and with PNUnit providing parallelization you may lean a little bit more.
I guess I am going to toy around more with NUnit VS2012 integration to see if I can somehow get as comfortable a workflow as I do running NUnit tests in VS2013. I will also toy around with PNUnit as this would have an immediate impact on my decision for automation engine at work.
